Quilty Project Management
Estimated reading time: 8 minutes
Like most quilters, I usually have a lot of quilting projects going on at any given time. When friends last asked me how many WIP’s I had, I think I told them there were 14, which is a little embarrassing. Don’t get me wrong…I LOVE quilting and I usually enjoy every project I work on. But there are times when I will hit a rough patch, and think “I need to do something else for awhile.” And then there are times when I get distracted (my ADHD brain) because I see something new, interesting or just plain cool. There’s no way I’m gonna wait for the current project to be finished before I dig into that new fun thing.
Note: This content is a bit out of date. A more recent post on quilt project planner pages can be found here.
It’s a good feeling to be able to say that I have crossed a few of those 14 WIP’s off the list, but I’m pretty sure I’ve added some things to the list, too! It’s the way it goes in my quilting life. So, sometimes it’s easy to lose track of what I’ve done with those projects and where they are at on the path to completion. Today I thought I’d share my little system for keeping my projects (and my brain) from turning into complete mayhem. Because the goal isn’t just to start projects, but to finish them, and hopefully finish them in a timely manner!
My little system
There are actually two parts to my project organization system:
- Physical. All materials for any given project are physically organized in a way that allows me to switch between projects quickly and easily.
- Mental. Each project gets logged into a project management app on my phone called “TRELLO.” As the project flows through the different steps towards completion, I have a written record of where things are at when I left them.
So, are you thinking “Project Management App? I’m out!”??? I can assure you it’s not as elaborate as it might sound, and the time it saves me, in the long run, makes any time spent using it well worth the effort. (You can check out the TRELLO system on their website, linked up here.)
A place for everything
The first step for me when I begin a project is to gather all the fabric and materials needed for that quilt and keep them together in one spot. I’m partial to the large, deep ArtBin boxes. They are clear, allowing me to see the contents. They come with a sturdy handle for carrying and little plastic dividers for configuring the roomy interior. I also love the way they stack and fit nicely under my cutting table. I turn them sideways with the pattern facing toward the outer side so that I can see at a glance which project each box contains.
The link below is an affiliate link, which means that if you click the link and choose to make a purchase, I will earn a commission. This commission comes at no additional cost to you. Please know that I only link to items which I personally use and feel that I can confidently endorse.
One lesson I have learned is to NOT store my tools in the project box. Tools go back in their spot on the wall because they get shared between other projects. You would think that would have been obvious to me, but unfortunately, I have “lost” a few good tools only to find them 2-3 months later when I returned to a long-dormant project!
So, having all the necessary items for a project in a designated spot is very helpful. As I switch between projects, I don’t have to waste a lot of time figuring out where all the items are. Best of all, if my quilting buddies call an emergency sew-in and I decide to work on Project ‘X’, I only need to grab my tools and equipment then locate the Project X box and off I go!
The Mental stuff is a little harder for me
I keep telling my husband that I’m a bit ADHD and he does not believe me. And that’s because he’s not privy to all the chaos that goes on in my head and the battle I wage to keep myself on task and focused. Believe me when I tell you that inside my head I am often all over the place! Way too many ideas and thoughts crashing around in there, and so it’s sometimes difficult to nail down exactly what I need to let go of and what I need to hang on to in order to get some work done! That’s where the project management app saves the day!
For years, I’ve been a “list person.” I have survived my lifetime of brain chaos by living off of lists. I begin each day with a list, I work throughout the day crossing items off the list, and then at the end of the day, I make a new one so that I can start the whole thing all over again on the next day. There are zillions of list making methods out there, and you may have a system that works for you. The one that makes the most sense to me is a system like the JIRA “Kankan” boards we use at my job to manage our graphics projects.
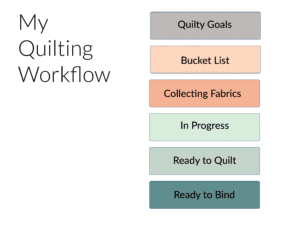
Trello (my phone app) is a similar concept and very easy to navigate. You simply create a “board” for each step in the workflow, then add a “card” for each project. The card might start on the “Bucket List” list, but then it gets moved up the ladder so to speak as I make progress on the project. As I work on the project, I can upload photos and write notes reminding me of where I was at when I stopped working or reminding me of a particular measurement I made. I might jot down the name of a fabric I’m using in case I need more of it. And I usually make a note of which rules or specialty tools I need for the job (because remember, those are not stored in the project box.). I put everything I need to know about that project on the card so it’s with me where ever I go. Here is a screenshot of my Trello board:
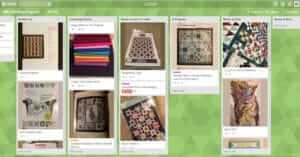
The cool thing about the Trello boards is that I get this great overarching list of tasks and projects, but I also have a visual of where the project is in the process. Trello boards can be customized to almost any workflow. Here are the main Trello boards I created with a Quilting Workflow in mind, but you can customize yours to whatever makes sense to you..
 For me, it all starts with goals.
There are a kazillion different quilts out there to be made. No way I can make all of them. For a quilt to make my “bucket list” it needs to first meet a “quilty goal.” Here are a few of my “quilty goals” for 2017:
- learn how to make an art quilt,
- design my own art quilt
- design my own fabrics on Spoonflower,
- make more quilts that are my own design
- improve applique skills
- improve FMQ skills using my home machine
- make an Improv Quilt
- Participate in at least one MQG challenge
I know… that’s a LOT of goals, but goals are what keep me focused. I see each of those goals as essential to help me get to where I want to go as a quilter.
Since I work full time, my quilting time is limited. I don’t want to waste time making quilts that I don’t find interesting or that doesn’t help me improve in the ways I want to improve, so each project must first pass the litmus test of aligning with my goals.
Making the bucket list
When I saw Laura Heine’s “Hazel Nutt” quilt pattern, I knew it was a perfect fit. Not only was it an art quilt, but it gave me the chance to work with applique and practice quilting on my home machine. It hit 3 of the goals.and in hindsight, it was also sort of an improv with intent kind of experience, too, so it sort of met 4 goals!
Once a quilt makes the bucket list, then I evaluate if I have materials in my stash or if I need to collect fabrics. Often a quilt pattern or idea will sit in the bucket list for awhile. To be honest, the Bucket list is the largest list on my Trello board. So many quilts….so little time. (which is why, once again, I need goals!)
Making Progress
When I’m ready to move forward, I move the card to “Collecting Fabrics” and start making notes on the card about what kinds of fabrics I’ve located and what kinds I still need to find. Once the fabrics are all in place and I’m ready to start cutting and piecing, the card gets moved to “In Progress.” And the cards get moved along the workflow boards as the project progresses. One thing to note is that I did have to add another board that I call “On Hold” because sometimes I get stuck. (I have a Lone Star project that has been in the On Hold board for over a year. I plan to tackle it a few weeks…)
So, there you have it. This is my little project organization/management system, and it works for me. I encourage you to try TRELLO if you think it might help you.
Update: A few years back I abandoned Trello and began keeping track of my projects using a TUL planner system. You can ready about that system on this blog post. I created my own printable planner pages for this system and offer them for sale to others in my Etsy shop.
Enjoy! And Happy Quilting!
Maria