Get Organized: An Efficient Cutting Station
Estimated reading time: 6 minutes
One of the best things I ever did to boost my quilting/sewing productivity was to create a permanent station in my sewing room for cutting fabrics. I realize that space is often at a premium in our homes, but if there is any way you can carve out a little room to dedicate to your projects, it is well worth it – even if it’s just a nook in your living area or bedroom. If you have young kids, it’s nice to have a spot where you can shut the door – especially since some quilting tools can be dangerous – but if nothing else, try to find a place where you can set things up and leave them until you can come back. Needless to say that the 15-20 minutes you spend pulling out and putting away your supplies are valuable minutes, and you can save even more time if you’re not having to go to another room with a table to cut your fabrics!
So, today I’m going to show you how I’ve organized my cutting station. It may not work for you, and there are some things I’d like to tweak, but for the most part it makes me happy.
Let’s talk erogonomics.
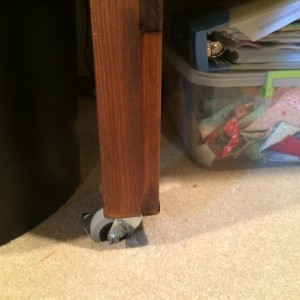
Using a standard height table puts unnecessary stress on your back every time you lean over to make a cut. Ideally, the top of your cutting surface should hit your hips. So, to save your back, raise it up! You can get creative with how you do this – maybe set it on concrete blocks. You can scope out your local home improvement store for those stock bun feet that you can add to the bottom of your table’s legs.
Here’s what I did:
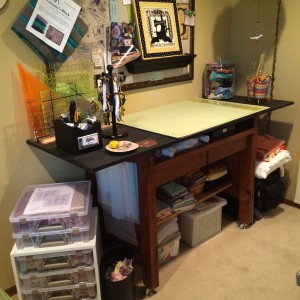
I believe in using what you have. Remember that pinewood Cargo furniture that used to sell at the mall during the 90’s? Well, my son had Cargo furniture in his room when he was younger and we had this desk that he had outgrown. That’s what I had to work with.
So, first we added 3″ casters to the legs. My husband cut and sanded a thick piece of plywood that sits on top of the “lip” of the desk. Altogether, this raised the height almost 7″ from the original height of the desk surface. I was able to make a shelf underneath the drawers, and this is where I store fabrics that I’ve reserved for special projects. As an added bonus, I got a little storage area between the plywood and the drawers where I now keep interfacings.
If you don’t have an outgrown desk to recycle and need to find a table, I suggest keeping an eye open for garage sale finds. I have a friend whose hubby converted a small garage sale dresser into a cutting table for her. This was a great choice because she also got some great storage. You can find cutting tables for sale at sewing and craft stores, but they are expensive and flimsy, not to mention that they just don’t have much personality to them. And they don’t offer any storage space, which was a huge negative in my mind. Your table will take up a large part of your sewing room real estate and it’s a shame not to maximize it for storage below. My opinion is that your money is better spent finding something you can repurpose and decorate to your own taste.
Keep those tools handy.
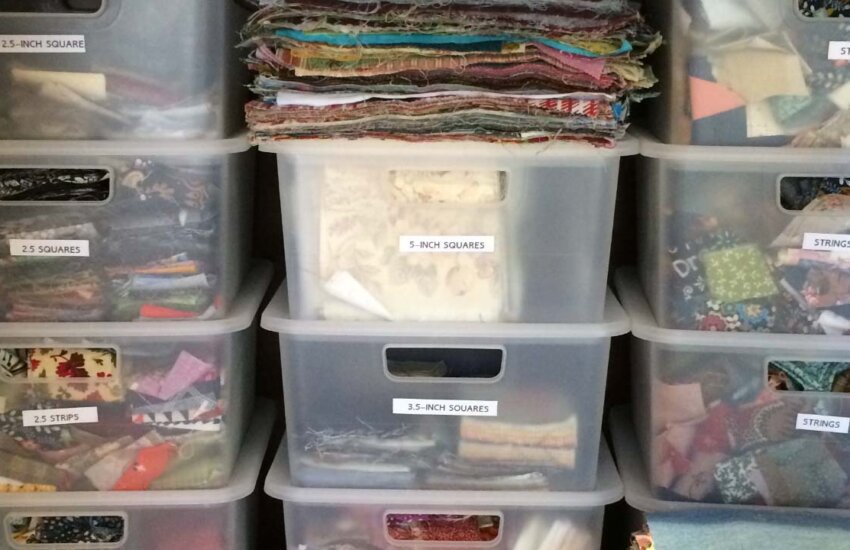
A basic principle of organization is to keep “like things together” and to keep items where they will be used. I made a list of the items I frequently needed at my cutting station, and I organized that area so that those items are always “at the ready.” Here’s what sits on top in addition to the obvious cutting mat:
- a ruler rack that holds my larger rulers
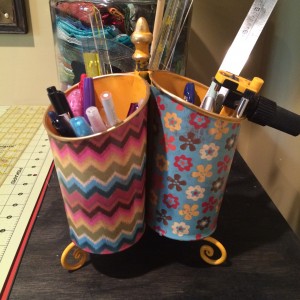
- a small wooden box that holds pens, pencils, paper, a calculator, and a lint roller for when strings get out of hand.
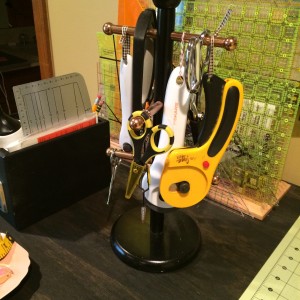
- a coffee mug tree (garage sale find) that holds my rotary cutters and scissors
- my pink pin plate (See previous post)
- a revolving organizer that holds marking pens, rulers and other measuring tools. (Notice I keep this on the OPPOSITE side of the table from my regular pens and pencils!)
- A glass jar of batik scraps – just because I think they are pretty and I don’t have another good spot for that big heavy jar!
Since my table is on casters, I am able to clear it off and roll it out if I need to use it to sandwich a quilt. The left drawer holds safety pins and binder clips, tiger tape and other quilting paraphenalia. Notice that to the left underside of my table I have a hook that holds a ring of quilting stencils. The right drawer houses more templates and drawing tools.
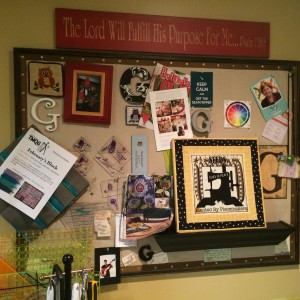
My cutting table sits against a wall where my “mood” board hangs. I’d like to get back to using it for more moody things, but lately it’s been the home for my smaller rulers and templates, since I’ve found that I like to have them within easy reach. (I use dull machine needles to hang them.) A small shelf is attached to the board (another item outgrown by my kids) and it’s handy for holding lots of things – currently my little design boards sit on top so they are easy to grab once the pieces to a block have been cut.
So, I’d love to hear your tricks for keeping your cutting area organized. Post a comment or send me an email!