
A Quilt Binding Primer (Part 1): What is Quilt Binding?
Estimated reading time: 8 minutes
Hello, there! You must have googled “what is quilt binding?” Or maybe you need to find out how to “bind a quilt.” Well you have come to the right place!
For several years I have taught a class in my area on how to bind a quilt. In that class we cover everything about quilt binding (from soup to nuts!). I realized that this information might be helpful to others. So I decided to write it all out and put it here on my website so anyone can find it.
There’s quite a bit of information to cover, so I have divided the information into quite a few posts. Today’s post covers some introductory information. By the end of this post you will truly understand “What is Quilt Binding?”
Future posts will build on that knowledge until we have covered all of the following topics:
- What is quilt binding and what is its purpose
- How to calculate how much binding and fabric you need
- How to make binding strips
- How to attach quilt binding to your quilt.
- How to get a beautiful mitered corner and a perfectly straight finish
- Hand-sewing tips
- Plus, an alternative binding technique using your machine
In addition to the blog posts, I’ve created a PDF download to go along with the information. This can be found in the Freebies section of this website. So, let’s get started!
What is Quilt Binding?
Binding is a strip of protective fabric that is attached to cover the outside (raw) edges of the quilt. It’s a finishing touch that makes the quilt neat in appearance. Binding also serves several other functions and we will talk about those later. But I like to think of it like putting a bow on a present. It makes all the difference to the final presentation!
French Fold Quilt Binding
There are several types of binding that you can make. The most common and traditional type used in quilting is “French Fold” binding.
In the French Fold binding technique, long strips of binding fabric (usually cut 2.5″ wide) are folded in half. These are then attached to the front of the quilt, raw edges aligned to the raw edges of the quilt. Then they are folded back over the raw edges towards the back of the quilt where they are stitched in place.

This results in a double layer of fabric covering the edges of your quilt. And that translates into an edge that is much stronger than just a single layer of binding fabric.
French Fold quilt binding is typically used because it allows the quilt to stand up to a little more abuse. Quilts that are used as bedding will get washed a lot. (And that’s a good thing, cause quilts were meant to be used and loved.)
There are also single-fold binding techniques that you might want to use in smaller objects (potholders, doll quilts) but French Fold is the way to go for a larger quilt.
What does Quilt Binding do?
The binding on your quilt serves three main purposes. Quilt binding:
- covers and protects the raw edges of the quilt;
- holds all the layers of the quilt together;
- frames your design, adding to the beauty of your quilt;
Bullets 1 and 2 are pretty self-explanatory, but let’s pause to talk about the third one. Your fabric choices for binding makes a big difference in the quilt’s visual design.
Quilt Binding Design Tips: Frame of Float?
From a design perspective, binding can serve to “frame” your quilt. This happens when you use a contrasting color.
If you choose a matching color that blends in with your quilt top, the quilt design will “float.”
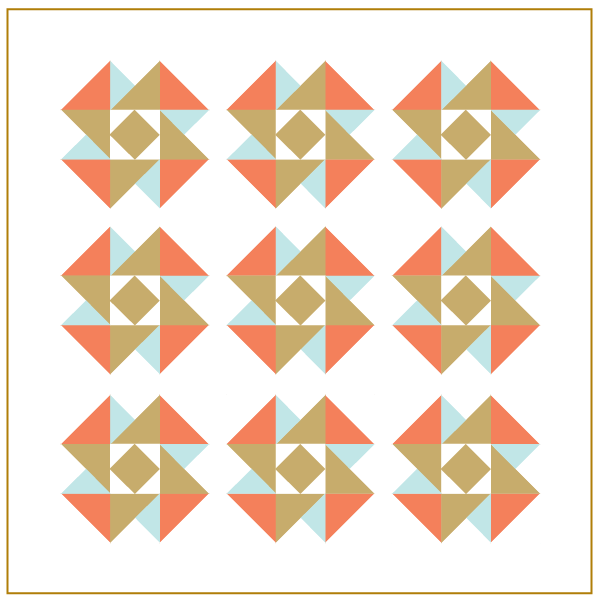
What do I mean by that? Take a look at the quilt designs below. In the first image the dark binding frames the design; the design is totally enclosed inside the binding visually.
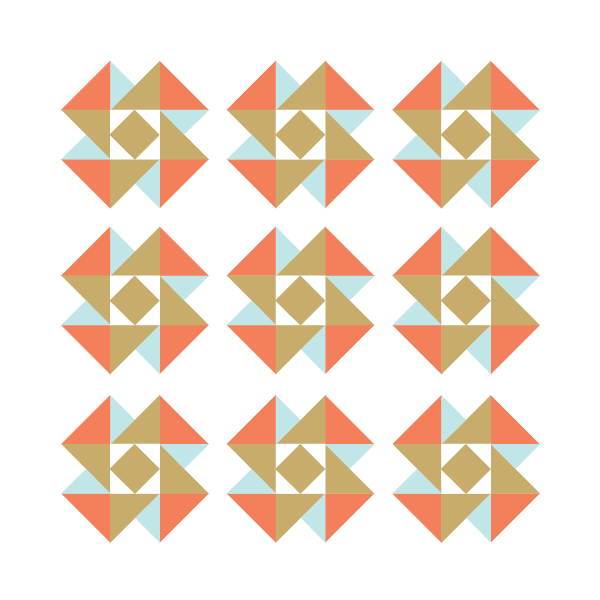
This next image shows a binding that matches the border (or floating into the border). Notice how the design seems to “float” in the negative space.
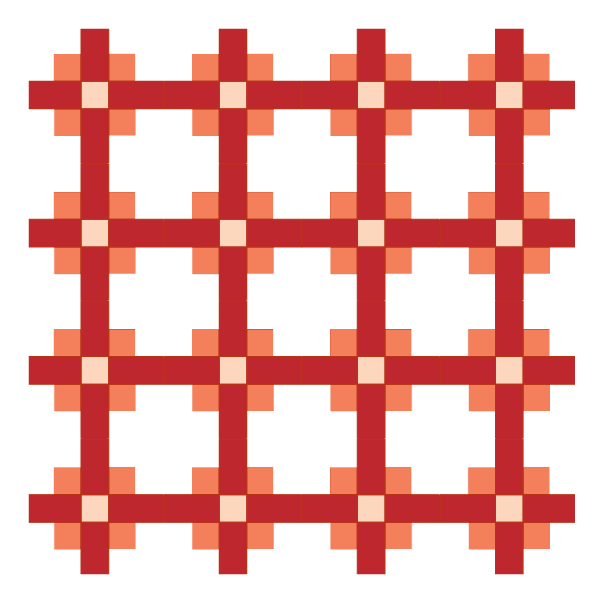
Here is another example, but this time the design goes all the way to the edge. Notice what happens visually when the binding is dark and what happens when the binding matches the background.
My personal preference when a design goes to the edge is to choose a dark binding that will frame it. The “frame” ties the design together, so that your eye knows where to focus.

Bottom line: take the time to think about the final look of the quilt once the binding is attached. Make sure that the binding you choose will give you the effect you are trying to achieve.
Choosing Quilt Binding Fabric
After I have pieced my quilt top, I choose my binding fabric. It is rare for me to choose it before the top is made. (The same is true for my backing.) If the quilt is primarily from one fabric line, I try to purchase enough up front to have a few options from the leftovers. More often than not, I purchase my binding and backing after the top is pieced. I like to see how the binding, backing and top all relate to each other. This is hard to do before the top is pieced.
When you are ready to choose a binding, I recommend that you audition several fabrics. Lay each one along the edge of your quilt top. Stand back and make sure you like the effect. Many times I’ve initially thought that I would prefer a solid for my binding. But after trying several out I’ve changed course.It just depends on the quilt and your preference, so try several options.
I will tell you that 9 times out of 10, my binding matches my backing. It is simply more cost efficient to use up the “excess” that was needed for the quilter’s frame. Unless I really don’t like the effect, that is what I will use.
And one more thing to think about if you when choosing your quilt binding fabric …
Dirt. Will. Show.
If your quilt is going to be used a lot, you might want to us a dark fabric on the binding.
One more little design tip about binding:
I learned this one when I first began to quilt from my quilting mentor, Miss Emma. A lot of quilters know this trick, but it’s a good one that bears repeating. Plaids, checks and striped fabrics make visually interesting bindings. Stripes look especially good cut on the bias. (We discuss this in detail in a later post.) If you purchase some fabrics from a line that has some checks, plaids or stripes, then pick up at least 3/4 yard of any that you think might work as a possible binding.
Your First Decision:
The first thing you must decide when you make binding is how wide to cut those strips of fabric. Let’s visualize this. First, you fold the strip in half. After it’s attached to one side, it is folded over the edges and is attached to the back of the quilt. Each of those steps takes up a little bit of the width. Several factors affect how wide your finished binding will be:
- The thickness of your quilt. If your batting has a high loft, it will consume more of your binding width.
- Your seam allowance. The wider allowance you use, the more width you take up
To keep things simple, we will always attach binding using a 1/4″ seam. There may be times when a wider one makes sense, but for now, a 1/4″ seam is our standard.
So, how wide should you cut it?
Most quilters cut binding that is 2.5″ wide. I cut my quilt binding strips 2.5″ wide if I plan to attach the binding completely by machine. Am I trying to make this super-fast? Is this quilt subject to frequent washing? If so, (think Baby quilts or placemats), then I attach the binding with a machine technique. If I plan to hand stitch the binding to the back (more important for heirloom or competition quality quilts), then I cut my binding strips 2.25″ wide. For machine techniques, I know I need that little extra .25″ to make sure the needle doesn’t miss the binding. In either case, I want my binding to fit snugly against the edges of my quilt when I attach it. So, after a lot of experimentation, I discovered that these two widths work great for me.
The Squish Test:
A hallmark of quality quilt binding is that it fits nice and tight. Here’s a test: take a quilt that is already bound, and squeeze the binding lightly between your fingers and thumb. Do you feel any squishy or gappy areas that are not filled up by the quilt? If so, then the binding is not attached tightly enough.
I think that’s enough for today. I’ll be back in a week to continue this topic. Next week we will discuss different options for cutting those strips and how to prepare your binding!

