
Quilt Coach Lesson 1: Strengthen your core by learning to sew an accurate 1/4″ seam
Estimated reading time: 5 minutes
Are you looking for ways to become a better quilter? If so, you are in the right place. This post on strengthening your quilting “core” is all about helping you learn the muscle memory so that you can sew an accurate 1/4″ seam, which is the foundation for beautiful patchwork and quilting. Learning to nail your quilting seam will produce accurate and consistent blocks.
If you enjoy this post, check out my post on how to do a SEAM TEST or my post on practice exercises. Both of these practices will greatly improve your accuracy
Today is the first post in my “Quilt Coach” series. And it’s going to be quick and simple. I’m not going to bore you with long posts about tools, equipment, fabrics, and all the stuff you need to get started. At least not yet. That information will come next week, but for now, I want you to get in there and not waste any time developing the one skill you really need if you’re going to be a “hard core” quilter.
While there are lots of skills to be learned, there is one skill that is the foundation of all those skills, and that is the “Quarter inch seam.” This is where quilting differs pretty sharply from typical sewing. Garment sewing uses a 5/8″ seam, and home décor projects often call for a 1/2″ seam. The quilting seam is much thinner. Why, you ask? to keep down the bulk. I’ll explain why that’s important in another future post, but for now, just take my word for it.
So, if you can nail a 1/4″ seam, all the pieces in your quilting puzzle are going to fit like a glove.
Fortunately, there are several tips and tools you can use to nail the 1/4″ seam.
TIP #1: Practice
That was probably not what you wanted to hear. Just like when your personal trainer tells you that if you want to strengthen your core you need to do a lot of planks (or whatever the prevailing wisdom is on core strength exercises. LOL! I wouldn’t know!)
Anyway, here is what I believe is the best way to practice. Fire up that sewing machine and get yourself some notecards with 1/4″ rule lines. The cool thing about this exercise is that you don’t need any thread – just a sharp needle will do. You’re going to sit down in front of that machine and sew on the lines. Do this for about 10 minutes. Repeat as often as you can, preferably every day.
- As you sew, keep your eye on the needle and take note of the rule line just to the right of the one you’re sewing on. This is going to train your eye for where the raw edge of your fabric pieces should fall on your sewing machine plate as you sew.
- After you sew down one line, look at how straight your needle holes are. Are they hitting the line perfectly or are they waving in and out? Keep practicing until you are making really straight lines with the needle.
PRACTICE MAKES PERFECT: When I first started out, I noticed that about every 6 months my accuracy would get a little better. The more you do it, the better you will get.
TIP #2: Get a 1/4″ foot (aka Patchwork Foot) for your machine
Now this does not take the place of practice, but it will help you with your practice. The patchwork foot has a guide on one side that will help you know where to line up the raw edge of your fabric. If you don’t already have one of these devices, go to a reputable sewing machine store and ask them to help you find a Patchwork Presser Foot for your machine. You’ll need to know your sewing machine make and model, and they should be able to tell you how to attach it to your machine.
Here is a picture of the one I have:
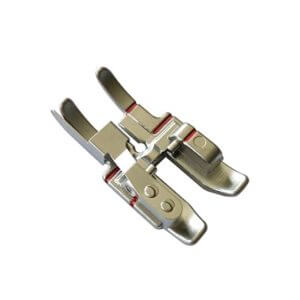
One word of caution, though. They are not always accurate. In a later post I will walk you through how to determine if your patchwork foot is accurate and if not, how to adjust for it.
TIP #3: Put a seam guide on your machine.
The easiest way to do this is to take a small stack of Post-it notes and position them so that they sit in front and 1/4″ to the right of your needle. (You can use a trimmed up note card to accurately note the position. If you want to spend money on a snazzier device, here are a few options, but I recommend you not invest too much yet. You can literally spend a fortune on this stuff, so my advice is to buy what you need to complete a project.
- Cottage Cutz Flexible Seam Guide
- Clearly Perfect Angle Sewing Template (I keep this one on my machine…does more than just help with 1/4″ seams)
- Qtools Sewing edge
So, get busy! Practice that seam! In the posts that are coming up, I’m going to tell you exactly what tools you need to get started, and I’m going to teach you how to rock your rotary cutter! And a really cool project is coming up to test your skills! But first, work that core!
Until next time, Happy Quilting!

