
Quilt Coach Lesson 4: Rotary Cutting
Estimated reading time: 2 minutes
Happy SATURDAY!
Yes, I am very late with this post…I can explain.
I ran into a snag with the quilt I originally planned to use as our project and I had to go back to the drawing board. But the good news is that I like this project MUCH better than the original.
Today is the day we are going to do this crazy thing that quilters do: take perfectly good fabric and cut it into pieces, which makes perfect sense, right? (Yes, and oh so satisfying! You will soon learn why Quilting is great therapy after a long day at work…)
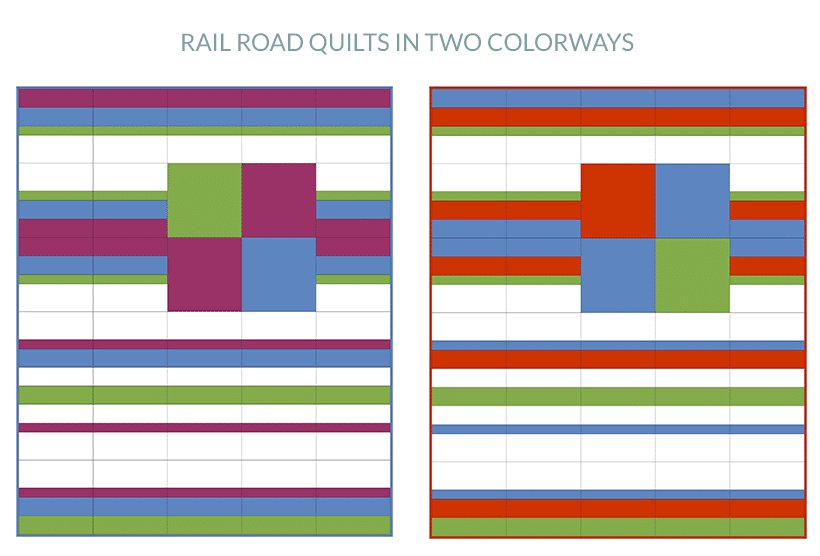
But before I get you started cutting, I would like to show you our project. It’s a small crib size quilt I’m calling “Rail Roads.” I’ve mocked it up in two color ways to give you a feel for the design. You’ll notice it uses three colors plus a background. You will be using the three colors you chose on your shopping trip to make this quilt. (See previous posts, if you’re new here).
I think it’s going to be a great skill-builder quilt! Here is why:
- We will learn how to Rotary cut and test for accuracy in the cutting phase.
- We are going to get some great practice with accurate sewing of our 1/4″ seams.
- We are going to experience some of the quilting basics: quilt block assembly, row assembly, proper pressing, nesting seams, squaring up and how to check for accuracy at each step of the process.
I will post the full pattern as a free download on my site in a next week.

