

Quilt Binding Bonus Lesson: Understanding Fabric Grain
Estimated reading time: 5 minutes
In this post I am going to try to explain fabric grain. In sewing and quilting, we often refer to the grain of the fabric, which means (in its most bast basic form) how the threads are running in the fabric. This isn’t too unlike how a woodworker has to understand the grain of the wood, or the direction in which the wood fibers are going.
Fabric has a tendency to move and stretch. Of course, this is why we love fabric…it’s soft, and moves with us. There is a reason we don’t wear clothes made out of cardboard boxes or aluminum foil! But that movement can make you crazy when you are trying to cut it perfectly straight.
In previous posts, I said a few words about stabilizing fabric with spray starch because starch stiffens the fabric grain, helping us wrangle it and keep it under control a little bit.
Understanding Fabric Grain Can Help You Become a Better Quilter
Accuracy can be greatly improved, not only by using spray starch, but by understanding the way fabric is woven and how it moves. A good quilter understands this movement and uses it to their advantage, and avoids stretchy cuts in unstabilized areas of a quilt or block as often as they can.
The Waft, the Weft, and the Bias
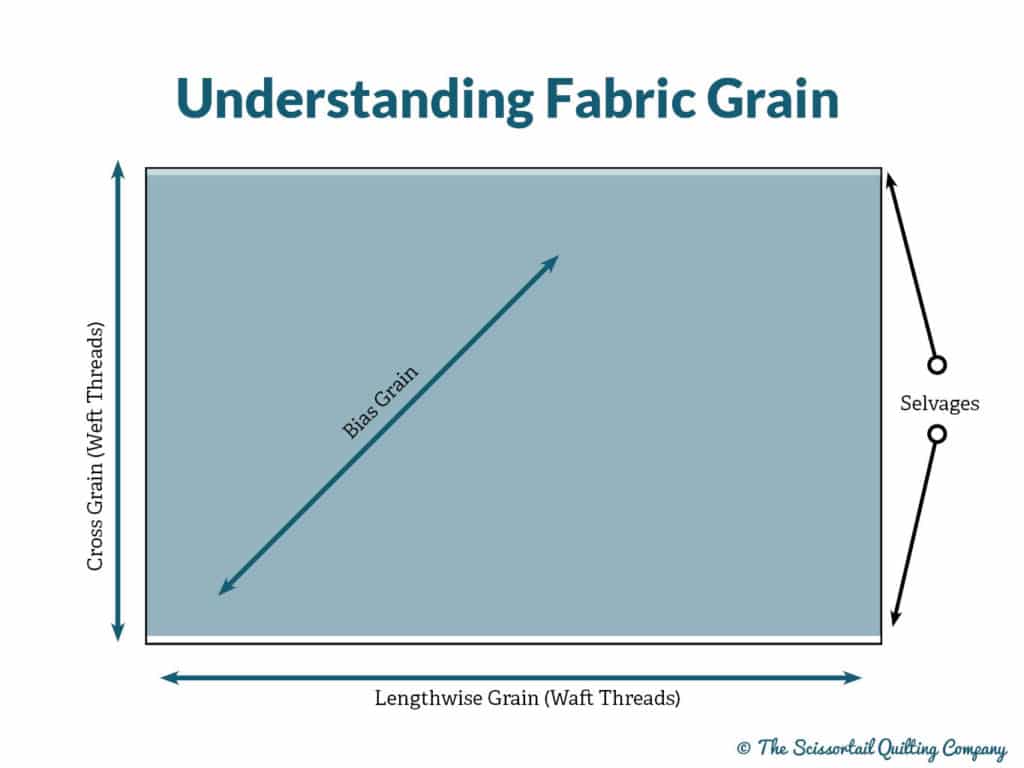
When fabric is manufactured, threads are woven in two ways – horizontally and vertically. Those threads that are placed horizontally are called the waft threads, and we refer to this as the lengthwise grain. These are placed on the loom at the start of the weaving process, and are held very tautly as the vertical threads are woven into the loom. Those threads that run vertically are referred to as the weft threads, creating the crosswise grain. Finally, if you can imagine a diagonal line through the waft and weft threads, that line is called the bias grain.
The horizontal threads closest to the top and bottom and pressed in more tightly, and we call this the selvage. It is used later to print important manufacturing information on the fabric, such as the name of the fabric line, the designer, and color bars that you can use to help you match other fabrics.
Those Misbehavin’ Wafts and Wefts
In a perfect world, this would be all I need to tell you. Unfortunately, the threads on the loom do not always stay perfectly straight. Occassionally the waft and weft threads get skewed in the process. When this happens, we say that the fabric is off-grain.
So, now that you know this little bit of information, here are the takeaways for quilters:
The selvage has almost NO stretch.
In general, you always want to cut the selvage off of your fabric, making sure you don’t mix it into your quilt because it’s not going to have the same amount of “give” as other portions of the fabric, and this tension can cause seams to pull apart over time. A lot of quilters save selvages to use in other projects, and my READ EVERY DAY bookcase quilt pattern uses them as appliques for the ‘spines’ of the books. A mistake I made early on in my quilts was leaving the selvage on the fabrics I used in the back of my quilts. Since they were large pieces that I was sewing to other large fabrics I didn’t realize it would make a difference. When you prep your fabric, it’s a good idea to cut the selvage edge off, cutting at about 1/2″ above the unprinted area.
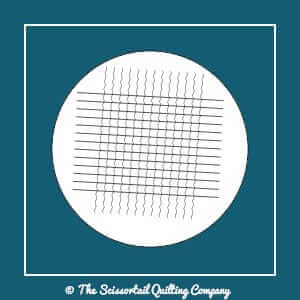
Notice the illustration below depicting the woven threads of a piece of fabric. If you imagine cutting these threads either lengthwise or crosswise, you will still have threads that are grounded by little grids of squares. This gives them a bit of stability when cut.
Fabrics cut along the lengthwise grain have the least amount of stretch
Because the waft threads are held tautly in the weaving process, they remain fairly tight when the fabric is cut. Pieces that are cut along this grain line will have the least amount of distortion, and this is why many quilters and pattern designers will recommended cutting borders parallel to the selvedge.
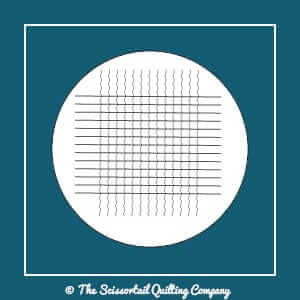
Crosswise grain cuts (strip cuts) will have a bit more stretch than lengthwise grain cuts, but are still fairly stable.
Crosswise cuts are probably the most prevalent cut in the quilting world because they are relatively easy to make. Strip cutting with a rotary cutter takes primarily uses crosswise cuts.
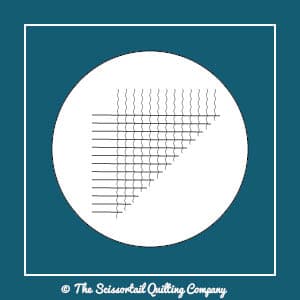
Bias cuts have quite a bit of stretch.
If you carefully examine the next illustration, you can see how a bias cut leaves a little triangular section of cut threads. Those dangling threads have nothing to hold onto, until the lengthwise and crosswise cuts, which leave the threads connected in little squares.
Now, you might be thinking, I don’t think I will typically be cutting fabrics along the bias, but watch out. Anytime you cut a square piece to make two triangles, you now have two pieces with bias edges.
Pieces with bias edges have to be handled a little more carefully to make sure they are not going to distort. But bias isn’t always scary, in fact, I will show you in my other posts how bias can be your friend, and you can work with it to your advantage!
So, now you are armed with a little more understanding about fabric, and you might find that it is good to know when you start cutting your fabric!
Happy Quilting!
Maria

